Introduction
Hi all,
In this easy guide, I'm going to show you how to control a LED using your android device via bluetooth. First of all let's see the major steps of this process.
Android Device
We need a bluetooth enabled android device for this project. I'm using Samsung Galaxy S5 smart phone for this.
Android App
We also need a special android app. You can download the app here. This app called "Arduino Bluetooth LED Controlling". Also this app created by me. In my next tutorial let's see how to create this app step by step. for now, simply download and install "Arduino Bluetooth Controlling" app to your android device.
Arduino Setup
Now let's see what are the hardware we need to build the Arduino setup. It is quit simple. You will need fallowing components for this.
- Arduino Nano
- HC-06 Bluetooth Module
- LED
- 220 Ohm Resistor
- Breadboard
- 5X Jumper Wires
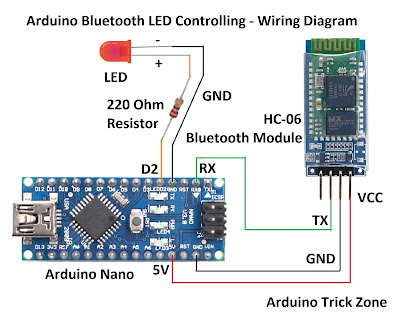
Here is the wiring diagram which shows how every thing hooked up.
After you connect everything correctly, it will see something like this.
Arduino Code
You can download the Arduino code for this project here. This code is very easy to understand with it's comment. After Downloading, You can upload the code to your arduino setup.
How It Works
Now, turn on Bluetooth in your Android device and run the Arduino Bluetooth LED Controlling App on your Android device.
Then tap the "Select Arduino Bluetooth LED" Button and it will open a list of your nearby bluetooth devices. Select your Arduino Bluetooth Module from it.
After that, tap the "Connect" button. After connecting to the bluetooth module you will be able to see "Bluetooth State: Connected" massage on the App.
To turn ON the LED, press "ON" button. "OFF" button will turn OFF the LED when you press it.
If you have any problem in this project, feel free to comment bellow. I promise you to help as I can. Thank you very much for reading my tutorials. Have a nice day.


No comments:
Post a Comment